Tuesday, November 29, 2011

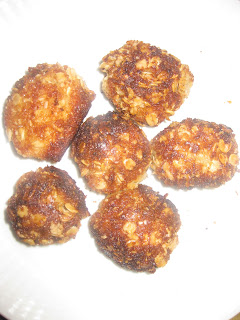
Mango Granola Bars

I like oatmeal, so it is no wonder that I love granola bars. It also known as energy bars or snack bars. I usually eat this before or after a cardio workout. Whenever I want something crunchy with a hint of sweetness, this is my go-to-food.  I consider this to be one of the healthy snacks; but there are some granola bars in the market that are loaded with sugar - high fructose corn syrup, melted chocolate, chocolate chips, maple syrup. Since  most of the available bars in the market contain wheat germ, wheat cereals and corn syrup, and with my allergy history (allergic to corn and wheat), I decided to make my own granola bars.  I added a Filipino touch to this version by using dried mangoes instead of the dried apricots or raisins. This is an easy recipe, even kids can prepare this with adult supervision. Health buffs can have these bars without feeling guilty


My Mango Granola Bars Recipe:

Ingredients:

2 1/2 cups Rolled Oats (old-fashioned oats)
1/4 cup rice crispies/rice cereals
3/4 cup sunflower seeds
1 cup peanuts, crushed (or any choice of nuts like pecans, walnuts, almonds, cashews)
1/3 cup brown sugar
1/2 cup honey
4 tablespoons butter
2 teaspoons vanilla
1/2 teaspoon salt
1 cup dried mangoes 

Procedure:
  1. Preheat oven to 400˚Fahrenheit.
  2. Mix the peanuts, oats and sunflower seeds in a greased and lined baking dish or pan with waxed paper. Toast them in the oven for 10-12 minutes, stirring every few minutes so that they won't get burned. 
  3. Prepare another baking dish/pan (preferably 11 x 13 inches) for your granola by lining it with wax paper. 
  4. Put the brown sugar honey, butter, and salt into a saucepan and bring it to a simmer, stirring constantly. Remove from heat, add the vanilla and mix well. 
  5. Stir the grains, liquid glue and dried fruit altogether in a large bowl. 
  6. Mix everything really well until the grains and dried fruit are coated with the liquid glue. 
  7. Spread the mixture in the pan with wax paper. Press well. Wait 3-4 hours. Wait for it to cool before slicing it into bars. 

If you don't have a convection oven, you can use an oven toaster to toast the grains. You can toast the grains in batches. You can make variations of this recipe. You can use little chocolate chips or raisins or any dried fruit instead of the dried mango. You can replace the dried fruit also with peanut butter if you like. You can make it all nutty-granola bars by mixing 2-3 kinds of nuts. There are so many possibilities for these granola bars. 

If you want healthier snack alternative, try this recipe. I'm sure you're going to like it =)

Tuesday, November 15, 2011

The Tea Series Part 2

As promised, I'm sharing my latest discovery in the milk tea craze. On a hot and humid day, I decided to try Gong Cha which is located at Sky Garden, SM North EDSA. I've been hearing a lot of good remarks on this milk tea station. It has always been in the list of Top 3 Bubble Tea Stores in the country today. So what's really the fuss all about?

Gong Cha, as their slogan says "Tea fit for Royalty," does not scrimp on their ingredients. It uses tea leaves not tea bags in brewing their tea, thereby infusing the flavor even more. It seems that they perfected the brewing process of tea. The drink comes in two sizes - Medium and Large.  It has seven categories to choose from: House Special (Bestsellers); Coffee Special; Pearl Ice Smoothie; Milk Tea; Creative Mix, Ice Cream Special; and Brewed Tea. It has four sugar options - 100%, 70%, 50% and 0%. Their ice options are Normal, Less Ice and No Ice. Gong Cha Milk Cream, Pearl, Coconut Jelly, Coffee Jelly, Grass Jelly, Fruit Jelly, Pudding, Aloe, Red Bean and Ice Cream comprise their extra options. These options make your drink customized to your taste. They offer not just tea, but coffee and chocolate drinks as well. They have kid-friendly drinks, like Lemon Juice with Aloe and Ice Cream Chocolate.

I chose the Gong Cha Milk Winter Melon Tea with coconut jelly, one of their bestsellers, and the Milk Tea with Pearl Jelly. I found the former to be refreshing. The drink is light-bodied even if it has milk cream on top. The latter drink is creamy not a watered-down version of milk tea. You can actually taste the tea in the milk. The pearl jelly in this drink has the right amount of sweetness. Also, it is chewy but has a certain bite. It's like 'al dente' for pearl jelly. 


There are four things that set them apart from the rest of the pack. First on the list is the deep flavor of their tea. You can actually taste the steeped leaves. Secondly, the right mix of tea, milk and flavorings creates a unique blend which leaves an impact on your palate. Their milk tea is really creamy. It's not watered down. You can actually taste the tea and not just the milk. Thirdly, it is their Gong Cha Milk Cream. I think they're the only ones who offer the milk cream as extra option. The milk cream is similar to the milk froth found in your latte and cappuccino. Lastly, it is their Ice Cream Option. I haven't encountered any other milk tea station that combines ice cream and milk tea.

The Gong Cha in Sky Garden, SM North EDSA has a fast and efficient service. The drinks are properly labeled. It indicates the type of drink, level of sweetness, ice option and extra option. I just wish that they will have seats inside the air-conditioned store, so customers will be more comfortable, especially on a extremely hot & humid day. I hope that they'll have more branches in the future.  Other than that, I really enjoyed my Gong Cha  Milk Winter Melon Tea.

If you want to try ice cream with tea or if you want to taste the milk cream (milk froth)  in your milk tea, you have to definitely try Gong Cha!

Monday, October 31, 2011

A Mickey Mouse Clubhouse Party Theme for my son, Joaqui

In preparing for a party, I really plan ahead of time. I get really excited in planning a party. Maybe because I've been much exposed to party planning early on since my family had always been the host of gatherings/reunion; and the years of arranging meetings, conferences, seminars, formal dinners have further given me skills and experience in handling events. I treat events as special projects of mine. I' always like to be hands-on any preparation. I admit that I'm OC to details. I even organized my own wedding. To show you a bit of how OC I am, for my wedding, I drew a six-month schedule prior to my wedding and made a matrix - indicating the person responsible for a specific task, detailed date/time allotted for it, resources needed and the expected outcome of that activity. I delegated the tasks to my trusted family members and friends, thus ensuring that my wedding and reception went on smoothly. So it comes as no surprise to me and my family and friends,  that I would take pains in preparing my only son's birthday party. 

Six months before my son's birthday, I started asking him where does he like to hold his birthday party and what inspirations or theme he would like to have on that day. He explicitly asked for his party to be held in McDonald's Quezon Avenue. He was very specific about the place. He has good memories of the place because he attended a few of his classmates' birthday parties there.  Since Joaqui absolutely adores Disney Junior; he requested for a Mickey Mouse Clubhouse theme. It was a good thing that McDonald's Quezon Avenue offers that theme and their party package includes the Mickey Mouse Clubhouse loot bags and prizes.  Thus, it made it much simpler for me to concentrate on the edible giveaways.

Since I had the luxury of time to search and procure the materials needed for a Mickey Mouse Clubhouse theme. The internet has provided me answers how to execute the chosen party theme and where to buy the materials. I thought that I really wanted the party to be "Mickey Mouse kung Mickey Mouse." So, I decided to make these items - Mickey Mouse Character Cake, Mickey Mouse Cupcakes, and Mickey Mouse Sugar Cookies. 

The Mickey Mouse Character Cake pan is one of the earliest cake pans sold by Wilton, so it is not readily available in the local market. I had to order this one from ebay. With the Mickey Mouse Cupcakes, I got inspiration from youtube on how to do different Mickey Mouse Cupcakes. Lastly, I bought the Mickey Mouse and Minnie Mouse cookie stamps, ingredients and packaging from Chocolate Lover. 

I baked a Lemon Chiffon Cake for the Mickey Mouse Character Cake. It took me 1 hour and 15 minutes to prepare and bake the cake. For its icing, I made a buttercream icing or decorators' icing and used star tips to decorate the cake.  This is the arduous task - making and coloring the icing and decorating the cake. Tinting the icing to a darker color may take more than 20 minutes alone, especially the color black. Four hours were consumed alone in completing this task. 

For the Mickey Mouse Cupcakes, I chose to bake a Red Chocolate Velvet Cupcakes with Buttercream Icing. I baked the 80 pieces regular size cupcakes in four and half hours. It's better to bake the cupcakes in the center of the oven. The cupcakes will come out perfectly in controlled temperature of the oven.  It will not have cracks or overflow from the liner. I made the icing and decorated the cupcakes in four hours.

With the Mickey Mouse Sugar Cookies, it took me two days to mix, chill, bake, decorate, dry and pack these cookies.

These tasks may seem daunting at first, but I had my handy helpers - Yaya Jane and Joaqui. We were like an assembly line at home. It was exhausting, but really fun to do. My son had so much fun in baking and decorating the goodies and had the first crack at tasting these treats.

It was indeed a labor of love. Seeing my son smile with much delight on his special day made all the pains and effort worth it.  Also, guests were appreciative of the edible tokens.


Mickey Mouse Party was pure HAPPINESS for my son - Joaqui. 


Tuesday, October 11, 2011

HALLOWEEN TREATS


My son's preschool holds an annual Halloween Party. Everyone gets excited in preparing for this event, including me and my son. Students and parents are requested to bring treats for all in this party. My son and I decided to make our own treats instead of buying it. It's cheaper to have it home-made, more personal and special. Also, it provides an opportunity for family members to bond. It simply spells "FUN." Plus, baking improves the child's motor-skills and helps him/her to do math. 

Joaqui always wants to help in the kitchen. He is my handy helper. He helps me in measuring and sifting dry ingredients. He loves the mixing part. But the best part of it all is that we'll enjoy a bite of our creations and share them with friends. 

Last year, we baked Monster Cupcakes. We had a great time decorating cupcakes, transforming them into creepy monsters. This year, we made spider webs, scary pumpkins and spooky ghosts sugar cookies. 

What shall we make for next year???


Sunday, October 2, 2011

My version of Batchoy

Due to insistent public demand, I'm sharing my recipe of Batchoy. In deconstructing this fare, I've tried to remember the different versions of La Paz Batchoy I've tasted in Taft Avenue and Leon Guinto. So here is my version. 


My version of Batchoy
Serves 3-4 persons
Ingredients
2 tablespoons garlic, minced
1 small shallots, chopped
2 tablespoons vegetable oil
250 grams beef shank, diced and include bones in boiling water
80 grams pork liver, diced
80 grams pork shoulder, diced
1.5 liters water or beef broth
2 pieces Beef Cubes (omit if using beef broth)
300 grams miki, washed
Salt & pepper to taste
2 tablespoon spring onions, chopped
¼ cup chicharon bits
1 tablespoon toasted garlic bits
2 hard-boiled eggs, sliced

  1.  .      Saute shallots and garlic in oil.
    2.      Add the beef shank, pork shoulder and liver. Saute for a minute.
    3.      Add water, salt, pepper and beef cubes, and then bring to a boil. Reduce heat to simmer and cook until the pork and beef are tender. (It’s better to use a pressure cooker to reduce the cooking time).
    4.      Add the miki noodles. Let this simmer for 3 minutes.
    5.      To serve, put miki noodles in a bowl topped with pork and beef pieces the pour the broth into the bowl.
    6.      Top with spring onions, chicharon bits, toasted garlic and sliced hard-boiled eggs. 


 It's perfect for the rainy weather. 

WEEKEND COOKING

On weekends, I feel doubly inspired to cook for my family from breakfast to dinner and even midnight snack.  I have more time to prepare an elaborate meal or a slow-cooked meal and my family has more time to enjoy it on these days.  Weekend is also a time in which family members are complete and take their meals at a leisure pace. There is no rush to finish meals quickly. There is more talk, ideas and stories exchanged over meals. Weekends are also allotted for get-togethers or reunions. Glorious food brings family, relatives and friends together. When catching up with family and friends, it is usually done over food (breakfast, brunch, lunch, afternoon tea or coffee, dinner and nightcap).

It has been a tradition for my family to have special meals on weekends. My mom used to cook her specialties and our favourites on these special days. I remember when I was little; our Saturdays would be all about home-cooked meals. Fried rice, sunny side-up and dried fish would be served for breakfast. Then lunch would be a pork dish like Dinuguan, Callos, Meatloaf and Pot Roast, etc. My mom would cook everything from scratch. My brother, Monch, and I would usually help her in preparing the snacks that range from guinataan (mais and halo-halo), turon, bananaque, camoteque, biko, maja blanca, halo-halo, mais con hielo, saba con hielo, arroz caldo, champorado, pansit, palabok and pizza. Dinner would be usually a beef dish – Beef Puchero, Bulalo, Kaldereta, Mechado or Kare-Kare. Every meal would be ended with a dessert. My mom would serve a fruit salad or mango tapioca or pudding or ube halaya or leche flan or ice box cake.

When I think about it, I don’t know how my mom had done it. Serving special meals on weekdays and extra special food on weekends, and taking care of a husband and five kids would exhaust any ordinary person. But I think my mom did it because she loved us so much, wanted to express her love through good food and wanted to make our family much closer. So, I imbibed this food culture and tried to continue the tradition of weekend cooking in my own family.

The food served during weekends can be anything from simple to fancy, but prepared always with much love and thoughtfulness for family members to enjoy. Weekend cooking is putting an extra care and effort to bring smiles to the faces of your loved ones.


Cheers to weekend cooking!

Sunday, September 25, 2011

Oatmeal Chicken Nuggets

My husband and son love to eat chicken nuggets, but I find this grocery item a bit expensive,  Php80.00 for a pack of 10 small pieces only. To save money, I thought of making a homemade version of the chicken nuggets. With the help of different cooking shows and Yummy Recipe Book, I created my version of Oatmeal Chicken Nuggets. This is a healthier version than ones available in the market today. I'm able to make my son eat vegetable by adding grated carrots in this recipe. With this, you're sure of what kind of meat or what part of the chicken is used for the recipe. I've seen on the TV show "Food Revolution of Jamie Oliver", he presented that most of the ready-to-fry chicken nuggets in the USA use the backsides/bottom (fatty part) and bony parts of the chicken to constitute their "ground chicken."  So, it's really better to prepare your own food. You know what's exactly in it. 


This is a sure-fire hit with the kids and adults. It is best paired with ketchup or Barbeque sauce. It can be served as baon for the kids/adults. I usually prepare the nuggets a day before and keep in the freezer. 


Ingredients


500 grams ground chicken or skinless chicken breast fillet cut into 1 inch piece
1/2 cup grated carrots
1/2 cup flour
1/2 cup powdered milk
1 cup rolled oats
1 cup Japanese breadcrumbs
4 eggs
1 teaspoon salt, divided into 2 portions
1/4 teaspoon pepper, divided into 2 portions
oil for frying


Procedure


  1. In a bowl, combine flour, milk, salt and pepper. Mix well.
  2. In another bowl, combine the rolled oats and breadcrumbs. 
  3. Mix ground chicken, grated carrots, 1 egg, salt and pepper in another bowl. 
  4. Dredge chicken pieces in the flour mixture. (Use an ice cream scooper or round measuring spoon to scoop the chicken so that you will have a uniform size of the nuggets).
  5. Dip in 3 beaten eggs and coat with oatmeal mixture. Freeze the nuggets for at least 30 minutes before frying. 
  6. Heat oil then fry the nuggets until golden brown. Drain on paper towels. 


Thursday, September 22, 2011

VEGGIE PITA POCKETS


I first tasted this dish at my sister's house. I found out it to be really tasty even without a trace of meat in it. So I tweaked their recipe to make my own version. This is a staple in my cleansing diet. I prepare this meal whenever I want to get rid of toxins in my body. This recipe is for the health-buffs. 


VEGGIE PITA POCKETS

Ingredients


200 grams Asparagus, removed 1 1/2 inches bottom part, diced

4 squares tofu (firm), pan-fried & sliced into cubes
1 medium size carrot, diced
2 small potatoes or 1 medium size potato, diced
1 small red onion, chopped
4 cloves garlic, minced
1/8 teaspoon ground pepper
1/4 teaspoon salt
1/2 tablespoon liquid seasoning
2 teaspoon canola/vegetable/olive oil
2 tablespoon grated Parmesan cheese or 1/4 cup grated cheddar cheese
6 pieces whole pita pockets


Procedure


  1. Heat the pan and add oil once the pan is hot.  
  2. Saute garlic and onion in the pan.  
  3. Add the carrots, potatoes and asparagus into the pan, with an interval of 2 minutes per each vegetable. Season with salt, pepper and liquid seasoning. 
  4. Cook the vegetables until it's soft to the bite (approximately 8 minutes).  
  5. Stir in the pan-fried tofu. Set aside.  
  6. Heat the pita pockets in an oven or use a non-stick pan.  
  7. Slice into half the pita pockets.  
  8. Put the veggies inside the pita pockets.  
  9. Top with cheese and ready to serve.  


This serves 4-6 persons.
Enjoy this healthy but delicious food!


Tuesday, September 20, 2011

The Tea Series

In my food journey, I'd like to share my newest discoveries in gastronomic pleasures (which have turned out to be my favorites) and one of which is the Chatime. This is located at the Second Floor, SM North EDSA, Main Mall. 

Though I'm a self-confessed coffee addict, I love tea also, especially milk teas. Tea is the latest craze in town. Different tea stations are sprouting in the metropolis. I choose tea over coffee on days when I want to control my caffeine. The former has less caffeine content. I've tried many milk tea drinks from different tea stations and Chatime is in my Top 5 list for tea stations. 

Chatime has so many choices to choose from flavor, toppings, ice options and sugar level. The flavors have 9 categories - Mellow Milk Tea, Smoothie Series, Coffee, Oriental Pop Tea, QQ Jelly (drinks that have pearls and coconut jelly), Chatime Special Mix, Fresh Tea, Energetic Healthy Juice and Chatime Mousse. Each category has an average of 5 selections. You may choose pearl, grass jelly, pudding, coconut jelly, rainbow jelly, red bean and aloe vera for your toppings. Additional charge of Php15.00 - Php20.00 is applied on extra toppings. It also has 4 options for the ice: Non Ice, Less Ice, Normal Ice and Extra Ice. Regular (16 oz.) and Large (20 oz) are the sizes of their drinks, except for the coffee, which is 12 oz. This is my first time to encounter 6 choices for the sugar options, other tea stations only offer 3-4 levels of sweetness for their drinks. Chatime has 6 sugar options: 0% Sugar, 30% Sugar, 50% Sugar, Normal Sugar and Extra Sugar. Price ranges from Php60.00 to Php100.00. Plus, it offers the same vibe that you get from coffee shops in which you can unwind, relax, read newspapers/magazines, surf the internet, hang out with family and friends. Most tea stations don't have ample seats for their customers, since some of them are merely stands or kiosks. What sets the Chatime apart from their competition is their wide array of choices, making your drink really personalized or customized to your taste. 

These are what ordered in Chatime - the classic Pearl Milk Tea (for me), Taro Pudding Milk Tea (for my hubby Nelson) and the Taiwan Mango QQ (for my son Joaqui). I really liked the Taiwan Mango QQ, since it is kid-friendly. It does not contain caffeine. It's composed of fresh mango juice with pearls and coconut jelly. The blends were just right. You can actually see and taste the small fibers of the taro in the Taro Pudding Milk Tea. 


So if you want something new and fresh, check out Chatime!

Watch out for the continuation of my Tea Series!


Sunday, September 18, 2011

Breakfast Favorite - Beef Tapa


Beef Tapa with sunny side-up and fried rice or simply Tapsilog is my favorite breakfast. I really like my breakfast to be heavy. I can have this anytime of the day - morning, noon and night. I can never get tired of eating it. This is what I regularly order in Pancake House and other breakfast joints. I wanted to have this breakfast even when I'm just at home, so I made a homemade beef tapa. Allow me to share with you my special Beef Tapa recipe,(bragging aside) which is one of the favorites of my family and friends.


Homemade Beef Tapa (without the nitrates)


Ingredients
1/2 kilo Beef sirloin, sliced thinly
1 head Garlic, minced
3/4 cup Soy sauce
Juice from 8 pieces of Calamansi
4 Tablespoons Sugar
dash of Pepper
2 tablespoons of Oil for frying (Canola/Corn/Vegetable)

Dipping sauce
1/4 teaspoon minced garlic
dash of salt & pepper
dash of sugar
3 tablespoons vinegar
chili (optional)

Procedure

  1. Mix together the garlic, soy sauce, calamansi juice, sugar and pepper.
  2. Add the mixture to the beef sirloin. Marinate the meat for at least 6 hours or overnight. 
  3. Strain the meat from the mixture. Fry in oil until golden brown. 


VARIATIONS

You may add a slice chili pepper and a dash of paprika to make a spicy tapa. Whenever I have leftovers of my tapa, I add it to my fried rice, making it Beef Tapa Rice. Another way of preparing my beef tapa, I make the beef tapa flakes, though this is more time consuming.  This maybe done a day ahead. The said marinade is the base for my beef tapa flakes. Just add 3/4 cup of water to the tapa marinade. Let it boil for at least 30 minutes to make the meat tender. Once the meat is cool, use a fork and knife or better yet your hands to shred the meat into flakes. To make it more crispy, store the flakes in the refrigerator. When ready to consume, fry the flakes in oil. You may pair this with fried rice, sunny side-up or salted egg and tomatoes. Any leftovers of Beef Tapa Flakes, I add it to my fried rice with scrambled eggs, creating a new dish altogether Beef Tapa Flakes Rice. 


But for this day, I'll just have my Tapsilog with my freshly brewed coffee :)

Wednesday, August 31, 2011

Coffee 101

Brewing a perfect cup of coffee might seemed to be a daunting task for many people; leading them to rely on the instant coffee/3in1 sachets and/or on the nearby cafes. For me, I find most of the instant coffees to be too thin on my palate. It's light body and tastes just like water only with dark color and sugar. Getting my cup of joe from a nearby cafe is delightful, but certainly expensive if done on a regular basis, like everyday. 

 So, I'd like to share to you how to brew the perfect cup of coffee right at your home, which I learned from the different coffee/barista courses I took and from the book "An Introduction to Coffee" by Pacita U. Juan and Ma. Regina S. Francisca. 

Preparing a freshly brewed cup of coffee has 4 fundamentals:

  1. Freshness - To make good coffee, it is simply logical that you use good quality coffee beans. It should be always freshly roasted. It loses its flavor once it gets old. You have to consume a freshly bought pack of coffee beans within a week or two; or better keep it in batches in the freezer and thaw only what you intend to use. Grind coffee beans only what you will use right away. When you grind coffee, it also begins to lose flavor as it comes in contact with the atmosphere. Always store the coffee beans in airtight container in a cool and dry place. 
  2. Grind - Always use the correct grind for your chosen coffeemaker.  'The longer contact time of the coffee beans with water, the coarser the grind' is what you must always remember in grinding and brewing coffee. Also, DON'T REUSE GROUNDS. Over-extracted coffee becomes bitter. Since Burr Grinder, Institutional Bean Grinder and Espresso Grinder or Doser have calibrated grind settings, here is a quick guide to grind, when using the Blade Grinder (most common kind of home coffee grinder) or the manual coffee mill or hand mill: 7-10 seconds - coarse grind (good for French Press/coffee press and Percolator);15 seconds - medium grind; 20 seconds - fine grind (good for Auto Drip Coffeemaker); 25 seconds - extra fine (good for Turkish Ibrik; and  30 seconds - for espresso.
  3. Proportion - For a full-bodied and flavorful cup of coffee, use 2 tablespoons per 6-ounce cup or 180 ml. You will end up with thin bitter coffee when you try to scrimp on the quantity of the coffee. 
  4. Water - Always use filtered tap water from a good source, purified water or mineral water, but never use distilled water, since this will give you a flat-tasting brew. Also, use water of room temperature to ensure consistency in the brewing time. 

Choosing your coffee beans

There are four kinds of coffee beans to choose from:
  1. Arabica is the most popular variety and the most expensive and sensitive bean. It grows on higher elevations, thus the flavor is more refined. This is my favorite.
  2. Robusta is the harsher flavor profile. It has twice as much as the caffeine of Arabica. It thrives on lower lands. 
  3. Excelsa is commonly mistaken as Kapeng Barako, but it has a distinct jackfruit taste and grows in lower elevations. 
  4. Liberica is the Kapeng Barako. It has the biggest trunk, leaf size, beans and cherries among the varieties.
Also, you may combine the different kinds of beans in brewing the perfect cup of coffee to reach your desired taste, like mixing arabica & robusta beans. 


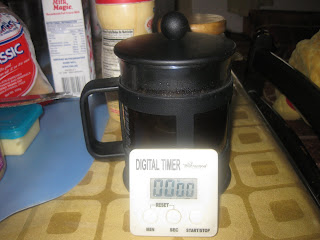
For me, I like to get my fresh cup of coffee by using my French Press or Coffee Press instead of the Auto Drip Coffeemaker. It is always aromatic, thick on my palate, full-bodied and flavorful. First, I measured 6 tablespoons of coffee beans and grind it (coarse grind). Next, put the coffee grounds in the French Press and pour the 540 ml water off the boil and allow it to steep. After four minutes, push down the plunger to separate the grounds from the brew. A freshly-brewed coffee is waiting for me. I like mine with creamer and muscovado sugar. How do you like your coffee?